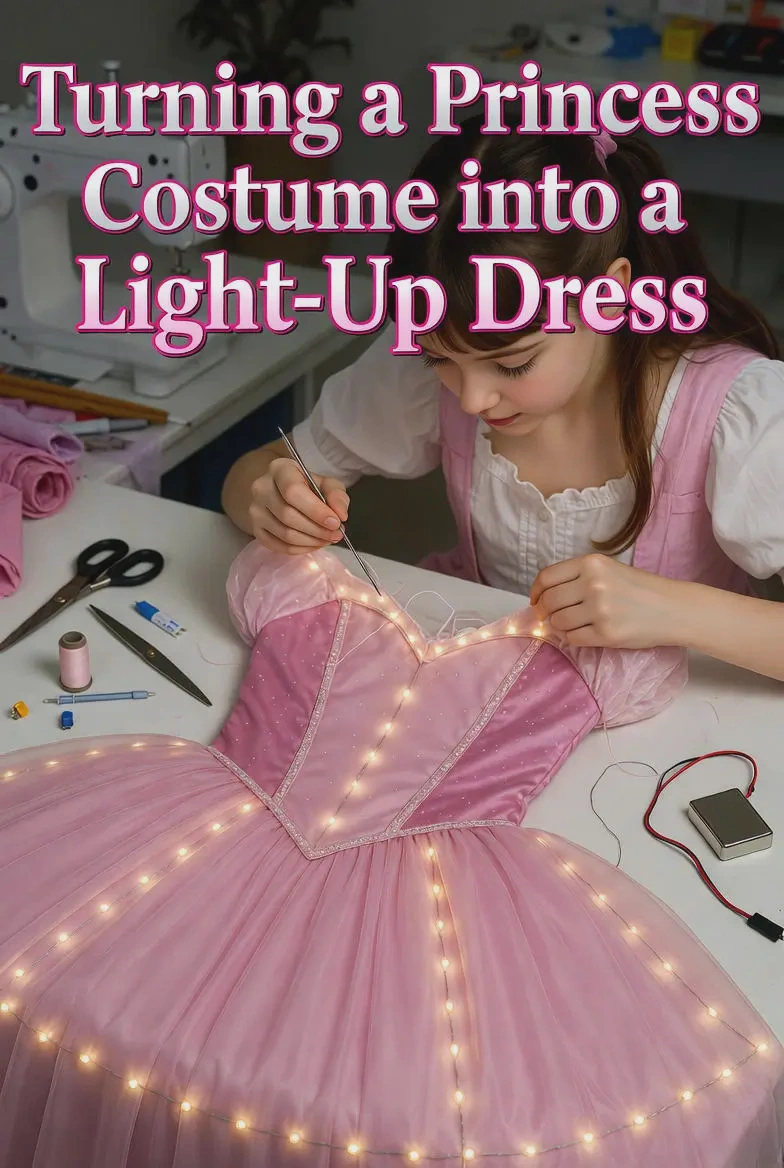
How to Turn Any Princess Costume into a Light - Up Dress (DIY Upgrade Guide)
News /
11/19/2025
Introduction
Adding a touch of magic to a princess costume by making it light up can create a truly enchanting look for special occasions like Halloween, parties, or dress-up playtime. This DIY upgrade guide will walk you through the steps to transform an ordinary princess dress into a dazzling light-up creation.
1. Gather Your Materials
1.1 Light-Up Components
- LED Lights: Choose LED lights suitable for your project. String lights with small, flexible LED bulbs are a popular choice. You can opt for warm - white LEDs for a soft, magical glow or colored LEDs like pink, purple, or blue to match the princess theme. Fairy lights with battery-operated packs are convenient as they are easy to install and control.
- Battery Packs: Select battery packs that are compatible with your LED lights. Make sure they are small enough to be discreetly hidden within the dress. Some battery packs come with on-off switches, which are essential for turning the lights on and off easily. Lithium-ion coin cell battery packs are a great option for their compact size.
1.2 Sewing and Attachment Supplies
- Thread: Use a thread that matches the color of your princess dress. This will ensure that any stitches are less visible. For a satin dress, a fine, slippery thread like silk thread can be a good choice, while for a cotton or tulle dress, a standard polyester thread will work well.
- Needles: Have a variety of needles on hand. A sharp, small-eyed needle is ideal for sewing the LED lights onto the fabric, especially if the fabric is thin. A larger-eyed needle can be used for thicker fabrics or for threading the battery pack wires through the dress.
- Fabric Glue: In addition to sewing, fabric glue can be used to attach the LED lights in some areas, especially if you're worried about damaging the fabric with stitches. Make sure to choose a fabric glue that is flexible and dries clear so that it doesn't leave a visible mark on the dress.
1.3 Other Tools
- Scissors: A good pair of scissors is necessary for cutting the LED light strings to the appropriate length, as well as for trimming any excess thread or fabric.
- Pliers: Pliers can be useful for bending and securing small metal components, such as the connectors on the battery pack or LED lights.
2. Plan Your Design
2.1 Decide on the Placement of Lights
- Bodice and Neckline: One popular placement is along the bodice and neckline of the princess dress. This can create a flattering, glowing outline of the upper body. You can arrange the lights in a straight line, a scalloped pattern, or in a decorative shape like hearts or stars. For example, if the dress has a sweetheart neckline, you can place the LED lights along the curve of the neckline for a romantic look.
- Skirt Hem: Another option is to line the skirt hem with LED lights. As the child moves, the glowing hem will create a beautiful, twinkling effect. You can also place lights in tiers if the skirt has multiple layers. For instance, on a ball-gown style princess dress with a wide skirt, placing lights on each layer of the tulle can add depth to the illumination.
- Accent Areas: Identify other accent areas on the dress, such as the sleeves, the back of the dress, or any decorative elements like bows or ruffles. Adding lights to these areas can enhance the overall design. For example, if the dress has a large bow at the back, you can wrap the LED lights around the bow to make it stand out.
2.2 Consider the Battery Pack Location
- Hidden Compartments: Look for hidden compartments within the dress where you can place the battery pack. Some princess dresses have built-in pockets, which are perfect for this purpose. If there are no pockets, you can create a small, discreet pocket by sewing a piece of fabric onto the inside of the dress. The battery pack should be placed in a location where it won't be uncomfortable for the child and where it can be easily accessed to turn the lights on and off.
- Securing the Battery Pack: Once you've chosen the location, make sure to secure the battery pack in place. You can use fabric glue or stitches to attach it to the fabric. If using stitches, be careful not to damage the battery pack or its wires.
3. Install the LED Lights
3.1 Sewing the Lights
- Threading the Needle: Thread a needle with the appropriate thread. For LED lights with small bulbs, you may need to use a very fine needle. Start at the back of the fabric and bring the needle up through the fabric at the starting point of your light placement design.
- Attaching the Lights: Carefully sew the LED lights onto the fabric. You can use a running stitch or a whipstitch to attach the lights. Make sure to sew through the fabric and the plastic casing of the LED light gently, without piercing the bulb or the wire. Space the stitches evenly to keep the lights in place.
- Moving Along the Design: As you move along your planned design, continue sewing the lights, making sure to keep the wire as flat and unobtrusive as possible. If the LED lights have a flexible wire, you can bend it to follow the curves of your design.
3.2 Using Fabric Glue
- Preparing the Area: Clean the area of the fabric where you want to attach the LED lights. Make sure it's free of dust and debris. Apply a small amount of fabric glue to the back of the LED light's plastic casing.
- Placing the Lights: Carefully place the LED light on the fabric, following your design. Press down gently to ensure the glue adheres the light to the fabric. Hold the light in place for a few seconds until the glue starts to set. Be cautious not to get glue on the bulb or the wire.
- Letting the Glue Dry: Allow the fabric glue to dry completely according to the manufacturer's instructions. This may take a few hours. Once dry, the LED lights should be firmly attached to the fabric.
4. Connect the Battery Pack
4.1 Wiring the Battery Pack
- Threading the Wires: If the LED lights and the battery pack come with separate wires, carefully thread the wires through the fabric to the location of the battery pack. Use a needle or a small tool to guide the wires through the fabric without damaging it. Make sure the wires are long enough to reach the battery pack comfortably.
- Connecting the Wires: Once the wires are in place, connect them to the battery pack according to the manufacturer's instructions. Some battery packs have snap-on connectors, while others may require soldering. If soldering, be extremely careful, as it involves heat and can damage the wires and the battery pack if not done correctly.
- Testing the Connection: Before fully securing the battery pack, test the connection by inserting the batteries and turning on the switch (if available). Make sure all the LED lights are working properly. If any lights are not working, check the connections, the bulbs, and the batteries.
5. Finishing Touches
5.1 Concealing the Wires
- Hiding the Wires: Use fabric or ribbon to conceal the wires. You can sew a strip of fabric or ribbon over the wires, following their path. This not only makes the dress look neater but also protects the wires from getting snagged or damaged. For example, if the wires are running along the edge of the dress, you can sew a coordinating ribbon over them.
- Tucking in Excess Wires: Trim any excess wires and tuck them away neatly. Make sure the ends of the wires are not exposed and cannot cause any harm or discomfort to the child.
5.2 Checking for Safety
- Ensuring Secure Attachments: Double-check that all the LED lights, the battery pack, and the wires are securely attached to the dress. Pull gently on the lights and the battery pack to make sure they don't come loose. This is especially important to prevent any tripping hazards or potential damage to the electrical components.
- Inspecting for Sharp Edges: Check for any sharp edges on the battery pack, the LED lights, or the wires. Make sure there are no exposed metal parts or rough edges that could scratch the child's skin. If you find any, cover them with fabric tape or smooth them out.
6. Conclusion
6.1 Creating a Magical Princess Dress
By following this DIY upgrade guide, you can transform any princess costume into a light - up dress that will surely make your child feel like a true princess. The process allows for creativity in design and adds an extra element of fun to the costume.
6.2 Enjoying the Glowing Results
Your child can now showcase their unique, light - up princess dress at various events, creating memories that will last a lifetime.