DIY Glowing Princess Dress: Transform Any Costume with LEDs

What if you could transform your child's favorite princess costume into a dazzling, one-of-a-kind light-up masterpiece? With our easy-to-follow DIY guide, you can upgrade any existing dress into a magical glowing creation that will make your little one feel truly enchanting—all without breaking the bank or needing advanced technical skills.
Learn how to safely add LED lights to any princess costume using our step-by-step tutorial. From choosing the right materials to concealing wires and power sources, we'll show you professional techniques for creating a stunning light-up dress that rivals store-bought options.
With just a few affordable supplies and our expert guidance, you can create a custom glowing costume that will be the highlight of any party or special occasion. Let's start by gathering your materials.
Why Create a Custom Light-Up Costume?
What Supplies Do You Need?
How to Install Lights Step-by-Step?
What Safety Measures Are Essential?
Why Create a Custom Light-Up Costume?
Creating your own light-up princess dress offers advantages that go far beyond simple cost savings. It allows for complete creative control, ensures the perfect fit with an existing favorite costume, and results in a unique piece that can't be found in any store.
DIY light-up costumes provide customization options that commercial versions can't match, from choosing specific color patterns to creating unique lighting effects that complement your child's personality and existing wardrobe.
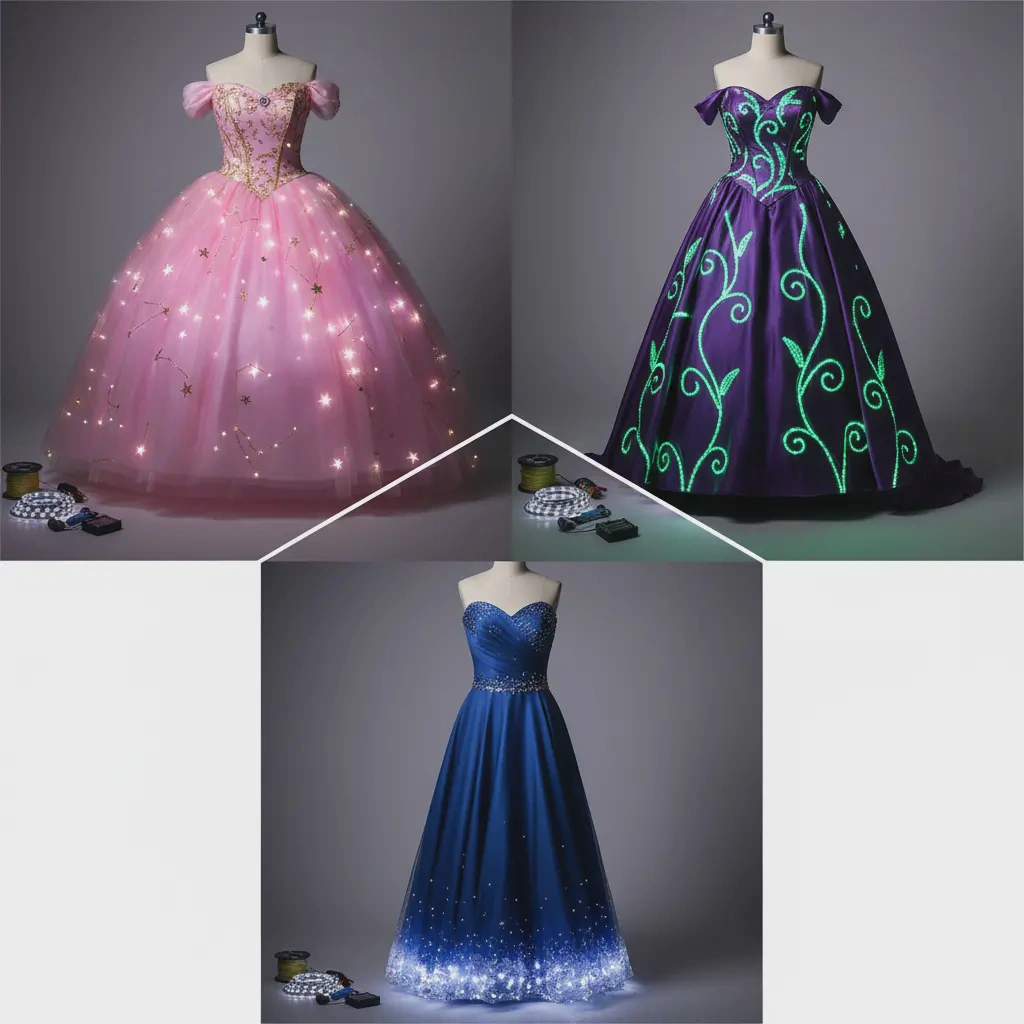
The benefits of taking the DIY approach extend well beyond the significant cost savings (typically 60-80% less than commercial versions). You maintain complete creative control over the design, ensuring the lights enhance rather than overwhelm the costume's original beauty. More importantly, you can upgrade a well-loved existing costume, preserving sentimental value while adding new magic. According to a survey by the Craft & Hobby Association, 73% of parents who undertake DIY costume projects report higher satisfaction compared to buying ready-made options. The skills learned can also be applied to future projects, from holiday costumes to party dresses, making this a valuable long-term investment in your creative toolkit.
What Supplies Do You Need?
Gathering the right materials is crucial for achieving professional-looking results that are both beautiful and safe. You'll need just a few key components, most of which are readily available at craft stores or online retailers.
The essential materials include LED light strings, reliable power sources, and basic crafting supplies. Choosing quality components ensures both stunning visual impact and long-lasting performance.
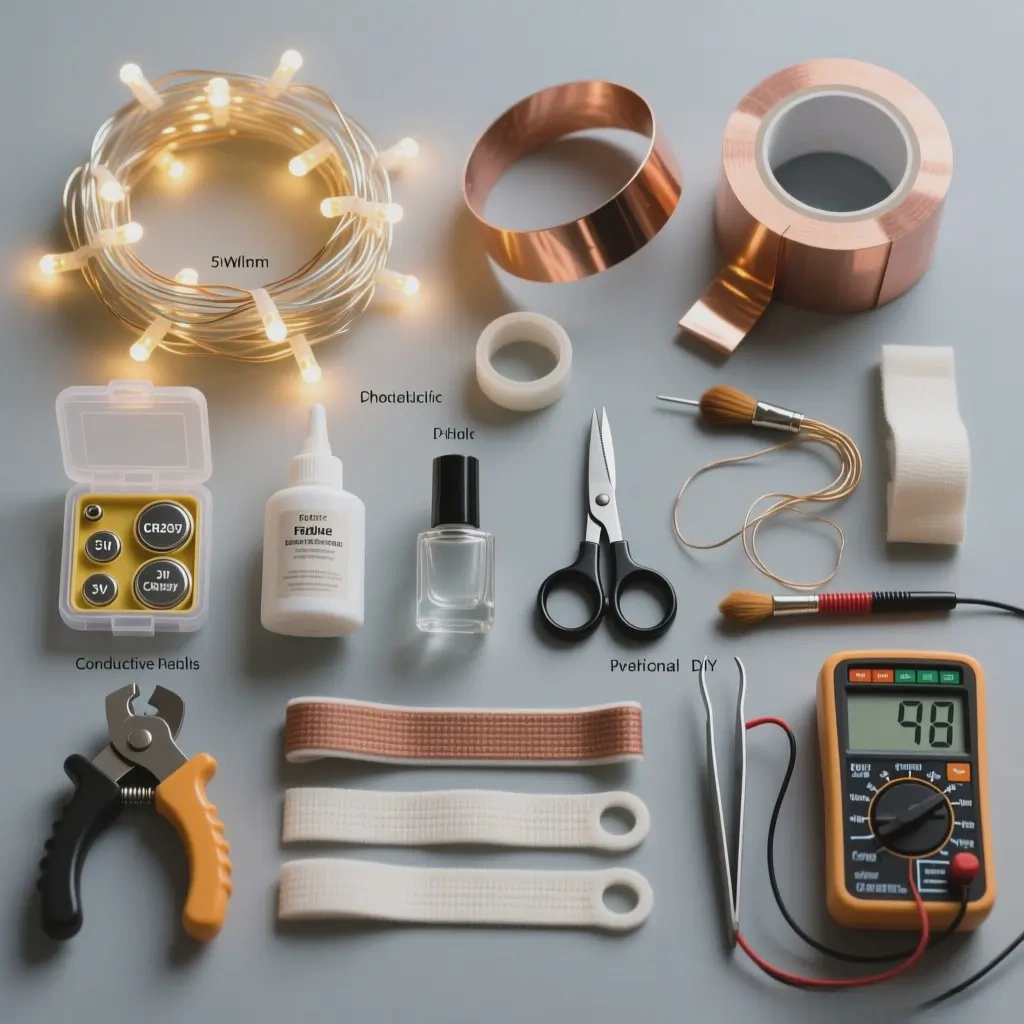
Your complete materials checklist should include:
Lighting Components:
Flexible LED string lights (3-5mm, warm white or multi-color)
EL wire for smooth, even lighting effects
Copper conductive tape for no-sew electrical connections
Power Sources:
CR2032 coin cell batteries for lightweight applications
AAA battery packs with switch controls for longer events
USB-powered options for extended wear time
Adhesives & Tools:
Fabric glue for permanent bonding to textiles
Hot glue for non-fabric elements and structural support
Clear nail polish for sealing wire connections
Small scissors, tweezers, and measuring tape
Quality matters most with LEDs and power sources. Invest in name-brand batteries for longer life, and choose LED strings with flexible wiring that can withstand movement and gentle bending during active use.
How do you feel about installing lights Step-by-Step?
The installation process is methodical but straightforward when broken down into clear stages. Following these steps carefully will ensure professional-looking results that are both secure and visually stunning.
Our five-step process guides you from initial design planning to final testing, with a special focus on creating secure attachments that withstand active movement while maintaining a beautiful appearance.
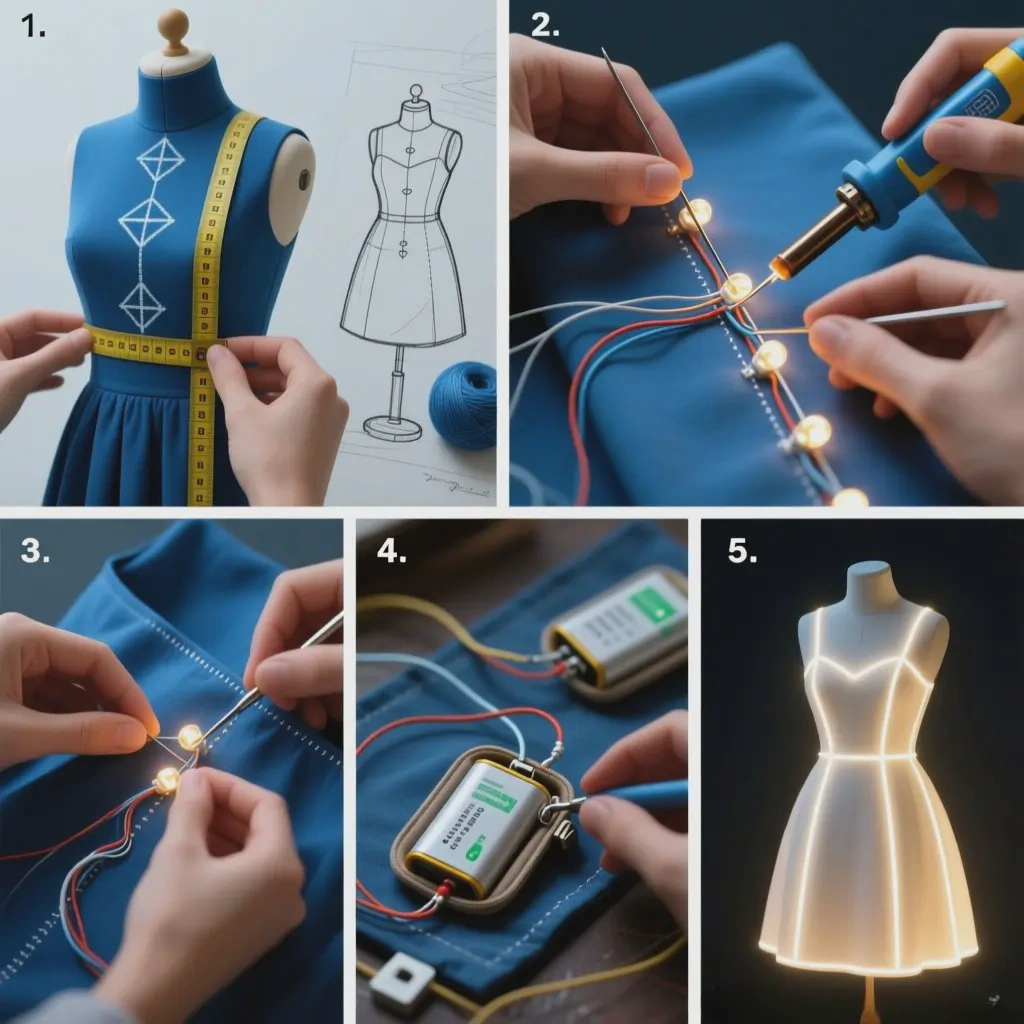
The transformation process involves these key stages:
Design Planning: Map your light pattern using fabric chalk or safety pins, focusing on areas that will have the most visual impact, like the hemline, bodice, or sleeves. Consider creating templates for complex patterns.
Circuit Testing: Check that all LEDs work properly before attaching them to the costume. Test battery life and switch functionality to ensure everything operates as expected.
Secure Attachment: Use fabric glue for temporary placement followed by careful stitching or fabric tape for permanent hold. For no-sew options, use quality fabric tape designed for textiles.
Wire Management: Route wires along existing seams and use clear fabric tape or create small fabric channels for invisible placement. Ensure wires don't pull or create tension points.
Power Placement: Install the battery pack in an accessible but discreet location, like the waistline or small of the back, using a velcro-backed pouch for easy removal.
Take your time with each step, and always test the lights as you go to identify and resolve any issues early in the process. According to electronics tutorials from SparkFun, proper wire management is the most critical factor in DIY wearable electronics success.
What Safety Measures Are Essential?
While creating a beautiful costume is important, safety must always be your primary concern throughout the creation process and during wear. These essential precautions ensure your creation is both magical and completely safe for children.
Key safety measures include proper battery insulation, secure wire placement, and temperature monitoring to prevent any risks during extended wear at parties or events.
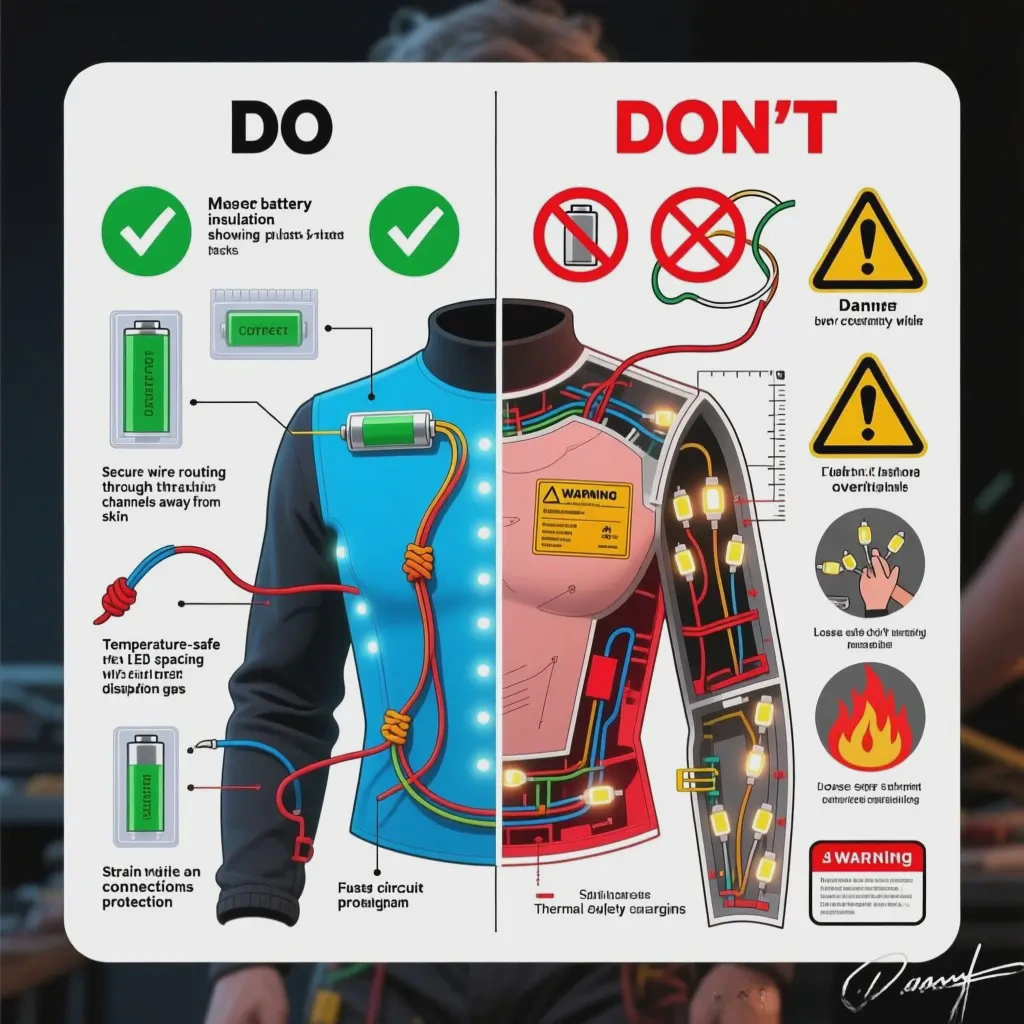
Critical safety protocols that must be implemented include:
Electrical Safety:
Use only quality batteries and ensure compartments are securely closed and insulated from direct skin contact to prevent burns
All wires must be completely insulated and secured to prevent snagging or accidental pulling
Include an accessible on/off switch and consider adding a fuse for added protection
Wearability Safety:
Use only low-voltage LEDs that don't generate heat, and never leave batteries connected during storage
Ensure no components rub against skin or restrict movement, paying special attention to arm and leg mobility
Conduct a "comfort test" with your child before the event to identify any potential irritation points
Usage Guidelines:
Remind children to use the lights only under adult supervision
Establish a maximum continuous wear time (recommended 4-6 hours)
Provide instructions for proper handling and storage
Always conduct a final safety inspection: check for loose wires, ensure batteries are fresh, verify that all components stay securely in place during movement, and confirm that no sharp edges or points are exposed. The U.S. Consumer Product Safety Commission provides excellent guidelines for DIY children's products that can inform your safety checklist.
Transforming a regular princess costume into a glowing masterpiece is an achievable and rewarding project that brings extra magic to any special occasion. By carefully selecting appropriate materials, following our detailed installation guide, and prioritizing safety at every stage, you can create a custom light-up dress that surpasses store-bought options in both beauty and personal significance. The skills you've learned open up endless possibilities for future creative projects, ensuring many more magical moments to come while fostering creativity and problem-solving abilities.
[External links recommendation]
ight Up Clothing Tutorials: How to Make DIY FashionTech and LED Wearable Tech Costumes
I made a light up dress?! | Fiber Optics ballgown
Light up princess dress I made for my daughter
Princess Dress How to Install The Lights